|
|
|
| Fig.1 | |
|
|
|
| Fig.2 | Fig.3 |
|
|
|
| Fig.4 | Fig.5 |
|
|
|
| Fig.6 | Fig.7 |
Dental Education Lecture: Simple Braces (2)
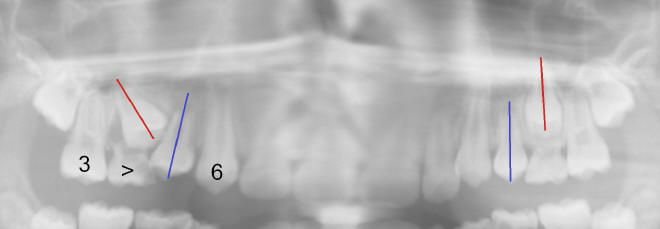
If we find tooth alignment problem early and get proper treatment done soon, we will get good result. Mary is 10 years old and has the similar issues. A baby molar tooth has a big cavity (arrowhead in Fig.1,2). X-ray (Fig.1) shows that the adult tooth (the long axis indicated by red line) above the baby tooth with cavity is out of alignment, as compared to the tooth on the other side. The neighboring adult tooth (blue line on Mary's right side, our left-handed side) is also off, as compared to the opposite side.
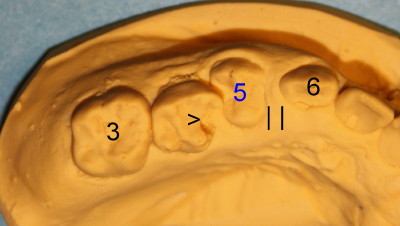
Fig.2 (model) shows the bite surface of the problem area. #3 is the first adult molar. #5 (the first adult premolar) is the neighboring tooth that is pushed out of alignment (in blue). Because of this, there is a gap between #5 and 6 (adult canine).
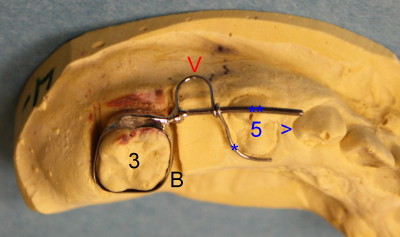
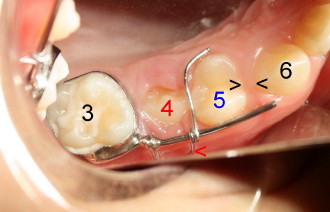
Therefore, we need to take out the baby tooth with cavity and place a special device (so-called loop spring, or simple braces) (Fig.3). The simple braces have several parts. The first is the band (B) that seats over #3. Two wires (*, **) holds the tooth #5 in place. Between the band and wires is a loop (red arrowhead). The latter has function of spring. Once the loop (red arrowhead) is squashed, the wire with single * will slide along the wire with ** and be pushed against #5. Since the molar tooth (#3) is bigger and stronger than the premolar (#5), the latter will be pushed forward (blue arrowhead) and become straight.
Once the 1st premolar (#5, blue line in Fig.1) becomes straight, the blocked out tooth (red line) will most likely come out straight by itself.
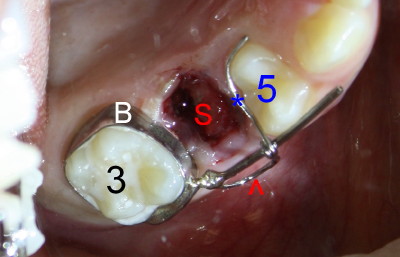
Now we need to work on the little girl: taking out the baby molar tooth (Fig.4). Bleed stops in no time, since the baby molar has short roots, as compared to those of the neighboring adult teeth (Fig.1). S stands for the socket after the baby tooth is out (Fig.4). Next, we cement the simple braces with the band (B) on the tooth #3. After the loop (red arrowhead) is squashed lightly, the wire (*) is more intimately contacted with #5, as compared to that in Fig.3). The tooth #5 is going to move forward soon.
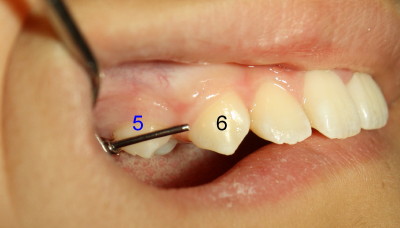
Fig.5 shows the cheek view of the area with simple braces in place.
Four months later, the blocked out tooth #4 makes its initial appearance (Fig.6). There is still a space between the teeth #5 and 6 (between black arrowheads). We squash the loop (red arrowhead) to push #5 forward.
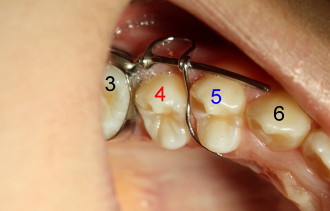
In another five months, the tooth #4 almost completely erupts (Fig.7). Also note that the space between 5 and 6 is closed. Now we can remove the simple braces. It appears that Mary does not need braces. If she needs them, everything should be much easier. Fig.4-7 show that Mary's teeth are kept very clean. She is a great kid in the eye of dentist.
Xin Wei, DDS, PhD, MS 1st edition 04/25/2010, last revision 12/29/2010